As a business owner, you strive to build an efficient, high-converting business. Shopify is one of the best and easiest to use e-commerce platforms that allows merchants to easily create their online stores while still having a great user experience. You can easily create your own Shopify online store and more importantly manage it even without technical skills.
In this step-by-step guide, you will learn how to create your store pages using one of the most popular page builders, PageFly, and make your store more efficient with Candy Rack – One Click Upsell, which will help you increase your sales and generate more profit.
STEP 1: Getting ready
1.1. Start a free trial on Shopify
Before you start building your store pages, you will need to sign up for a Shopify 14-day free trial.
- To start a free trial follow the link www.shopify.com/free-trial and enter your e-mail.
- Next, enter your email address, password, your store name and confirm by clicking the “Create your store” button.
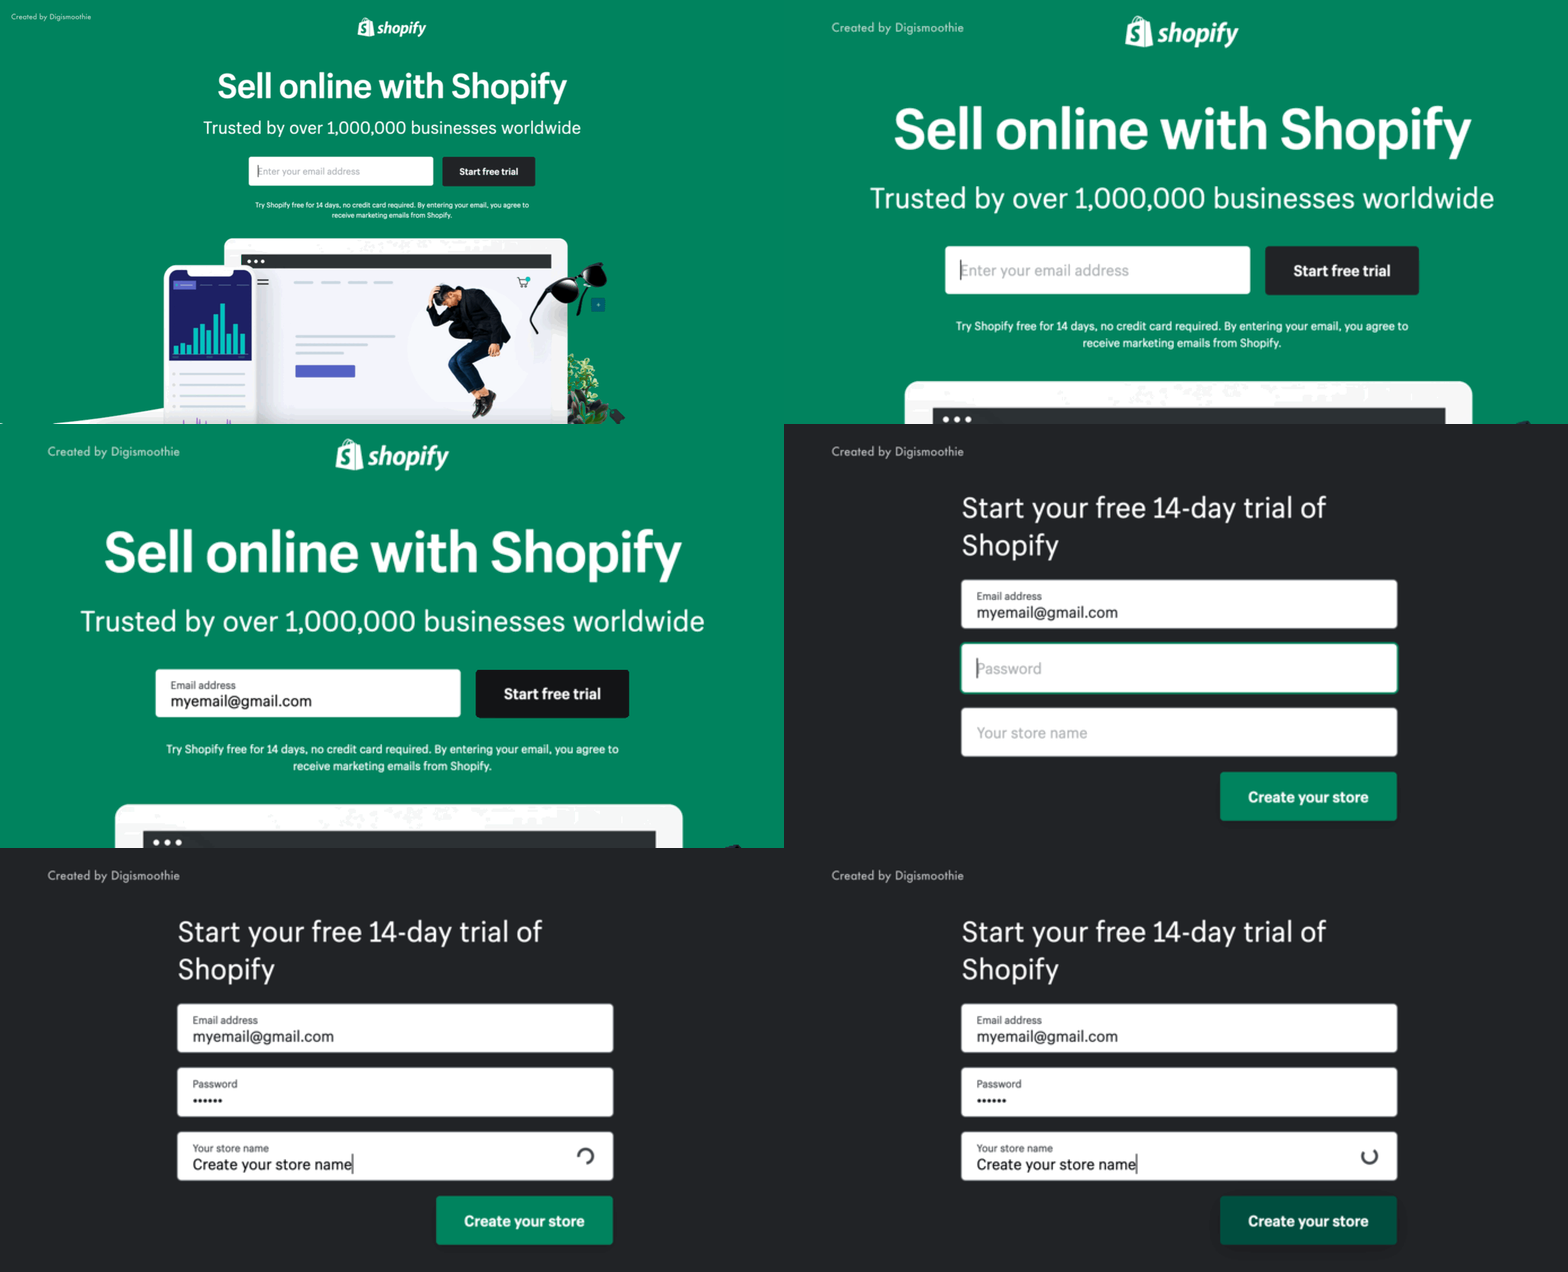
You will be also asked to optionally fulfill a short form asking for some details about your business and enter your business address, which you will be able to change anytime later.
If you need more detailed instructions about your Shopify account settings, you can follow this guide: How to Get a Free Shopify Trial for 14 / 30 / 60 / 90 Days
Once you have finished your Shopify Account Settings, it’s time to prepare quality content and add products to your store.
1.2. Prepare content and images
The human brain processes image 60 000 times faster than text. You will significantly improve your customer experience if you manage to provide your users with quality content both copy and images. Before preparing any content do not forget to think about your buyer persona – a fictional character, which you create based on your research to represent the different user types that might be using your product or service.
1.3. Add products
Make sure you have taken quality pictures of your products that can delight your customers and arouse the desire to buy the products you are selling. Also, try to think of a catchy title and write an informative product description, and do not forget to optimize each product’s SEO description, which will be displayed to your customers in search engines once they enter the keyword.
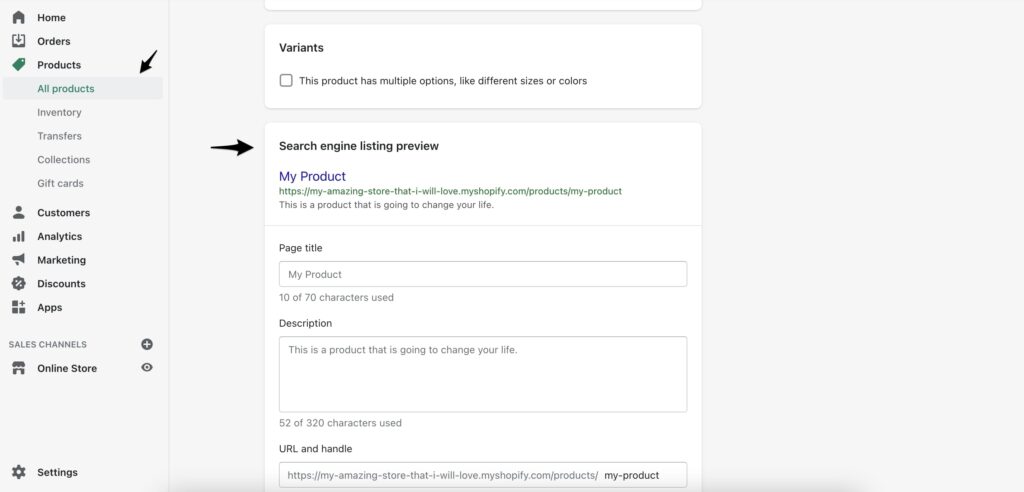
If you are looking for some tips to create a compelling product description, you can read the Hubspot Blog dedicated to this topic.
STEP 2: Evaluate the different options for building your store’s pages
As a store owner, you might be willing to differentiate yourself from your competitors and at the same time provide a technically stable solution for your store users to make their purchases. There are a couple of options for customizing your store pages and you can choose any of them based on your priorities, skills, and time available.
Option 1: Create your store pages using a standard Shopify builder
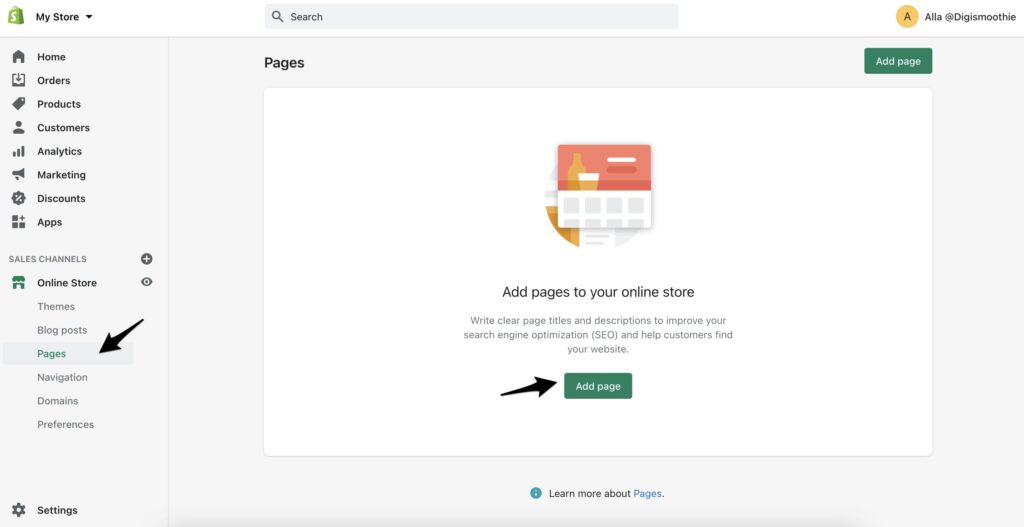
Use a standard way to create store pages by going to Online Store → Pages → Add Page. In the builder, you can write some text, add pictures or video and use HTML to adjust the page even more.
Option 2: Use default theme settings
Each theme has its theme settings that you can edit by going to Online Store → Themes → Customize. The adjustments options differ from theme to theme, but some of the common things that you can change are header, footer, colors, typography, add (or remove) some social media accounts or a search field and much more.
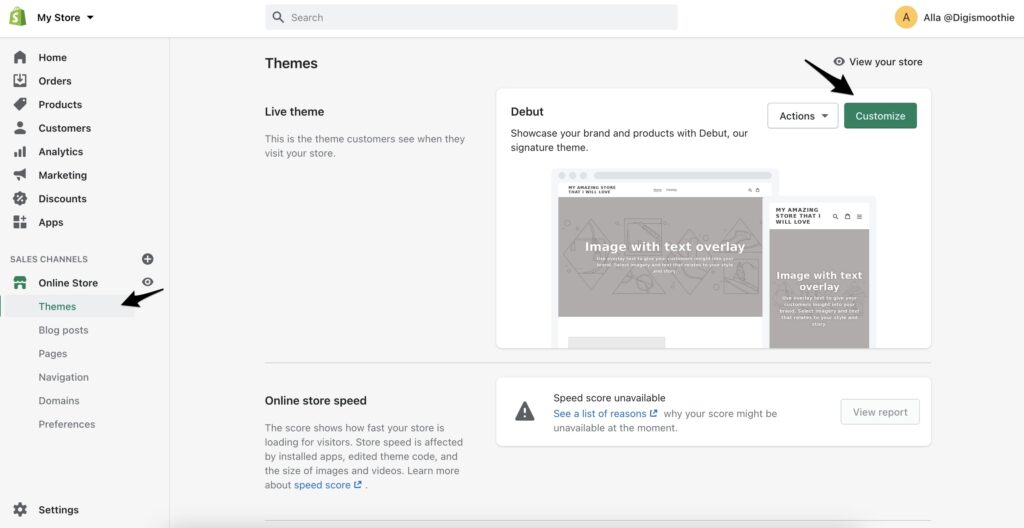
Option 3: Edit your theme code
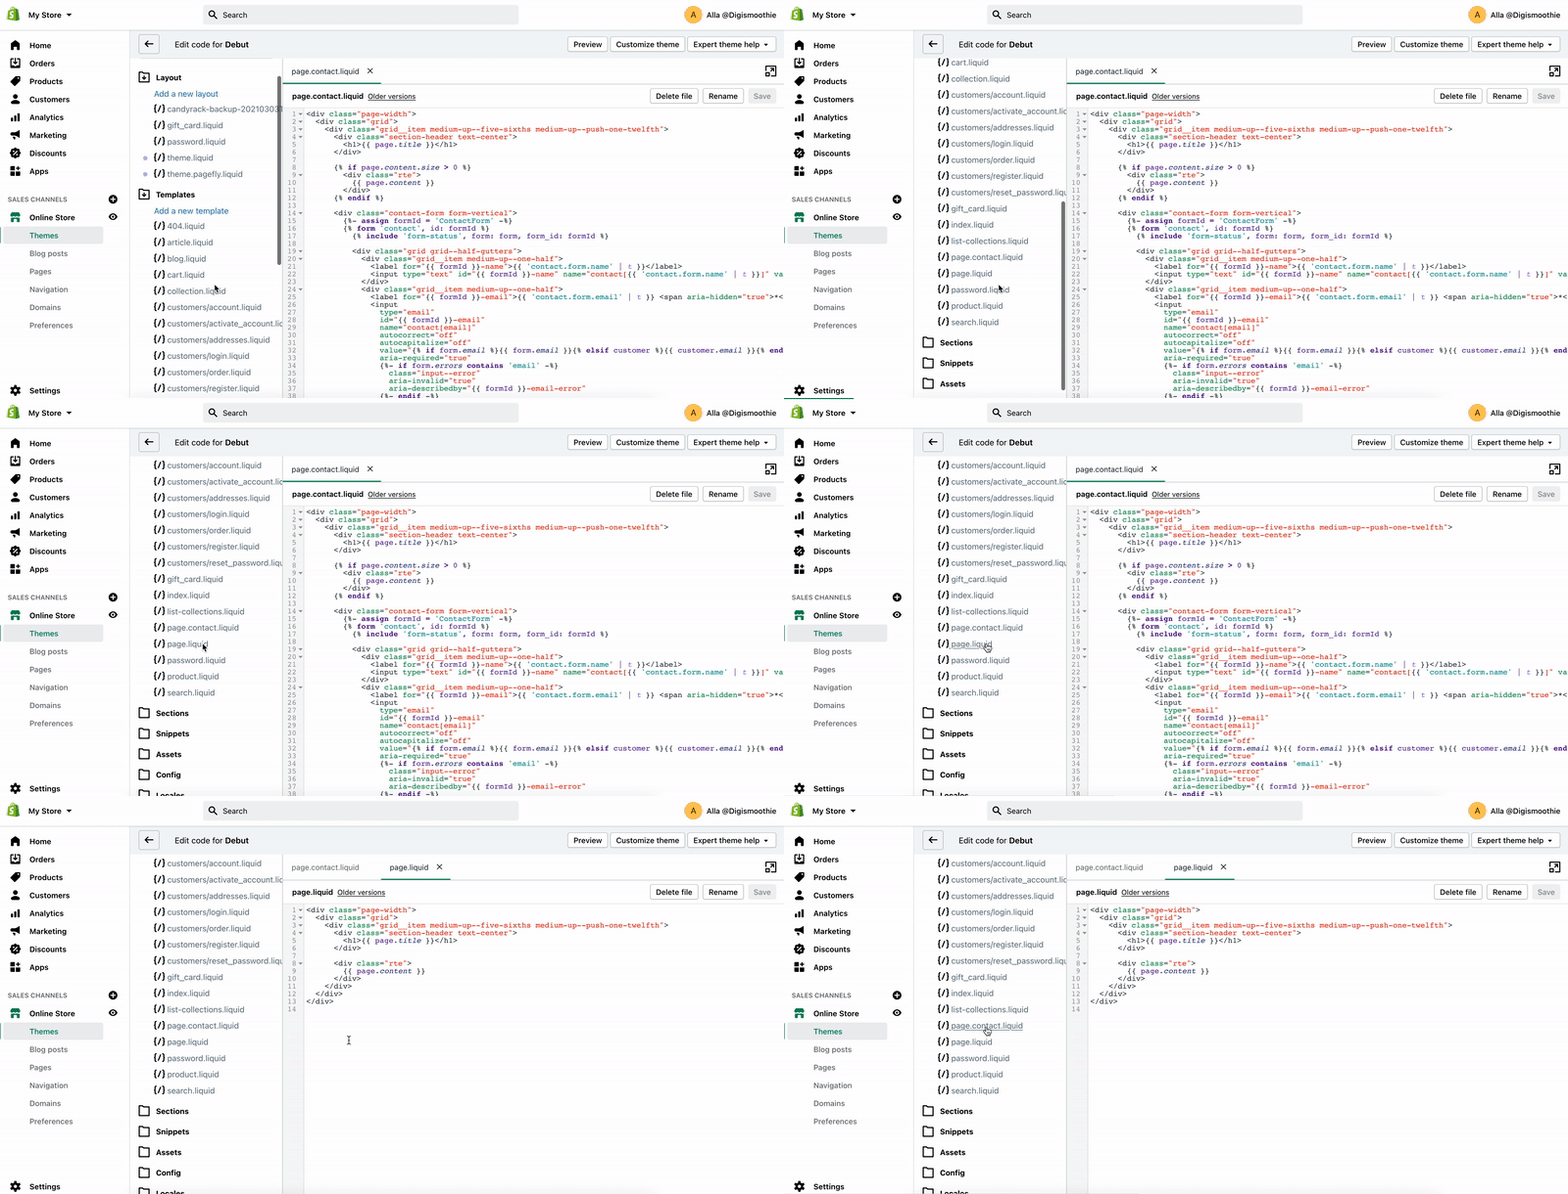
If you are comfortable with coding (HTML, CSS, basics of Liquid) you can consider building and customizing your store pages following the instructions that Shopify provides: https://shopify.dev/tutorials#themes
To start editing your store pages go to the Online Store → Themes → Actions → Edit code
Option 4: Hire the experts
Not all DIY stores end up being great and well-functioned online stores. For this reason, most of the merchants prefer hiring an expert or an agency. The team of professionals focused on Shopify store development can save you a lot of time and guarantee an astonishing outcome. The biggest advantage of online business is that you can hire experts regardless of their location. Digismoothie will be happy to help you to build or customize your online store, feel free to drop us a message in case you’ll need any help with Shopify.
Option 5: Use the Page Builder App
Building a well-customized online store that represents a unique image of your brand might sound like science for non-technical merchants. To achieve an outstanding design and at the same time deliver your customers a better experience, you can download a PageFly App that can help you with it.
STEP 3: Build your store pages with PageFly
The PageFly is a drag-and-drop-based page builder that enables you easily create your store pages. It has 6 different types of pages:
- Regular pages
- Homepages
- Product Pages
- Collection Pages
- Blog Posts
- Password Pages
PageFly is on TOP 5 App in Shopify App Store, powering over 85,000 Shopify and Shopify Plus merchants. It has a Free plan with full feature access, and a library of 70+ page templates that are CRO focused. PageFly support team is available 24/7 via in-app live chat.
Once you install the App, you will find it super easy to start building your store pages. PageFly team has prepared the seamless onboarding experience which will lead you through your journey.
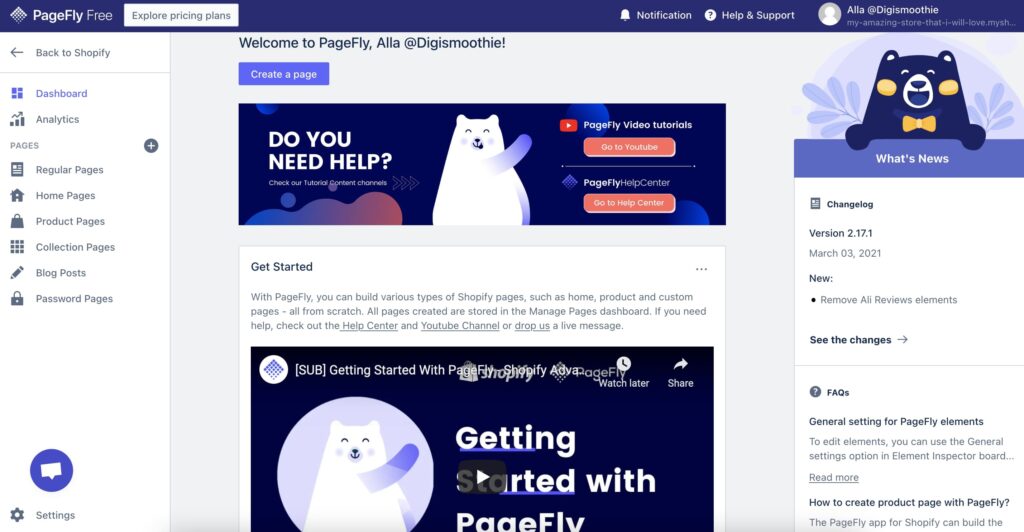
On the PageFly YouTube Channel you can find more tutorials that can help you to create your store pages.
STEP 4: Set up your Upsell strategy with Candy Rack
Once you have to build your store pages, you will need to optimize your business and make sure it works most efficiently. You can do that by installing the Candy Rack – One Click Upsell which will improve your store’s average order value and thus increase your profit and boost your sales.
4.1 Install the Candy Rack App
To install the Candy Rack App go to the Apps → Visit the Shopify App Store → Candy Rack
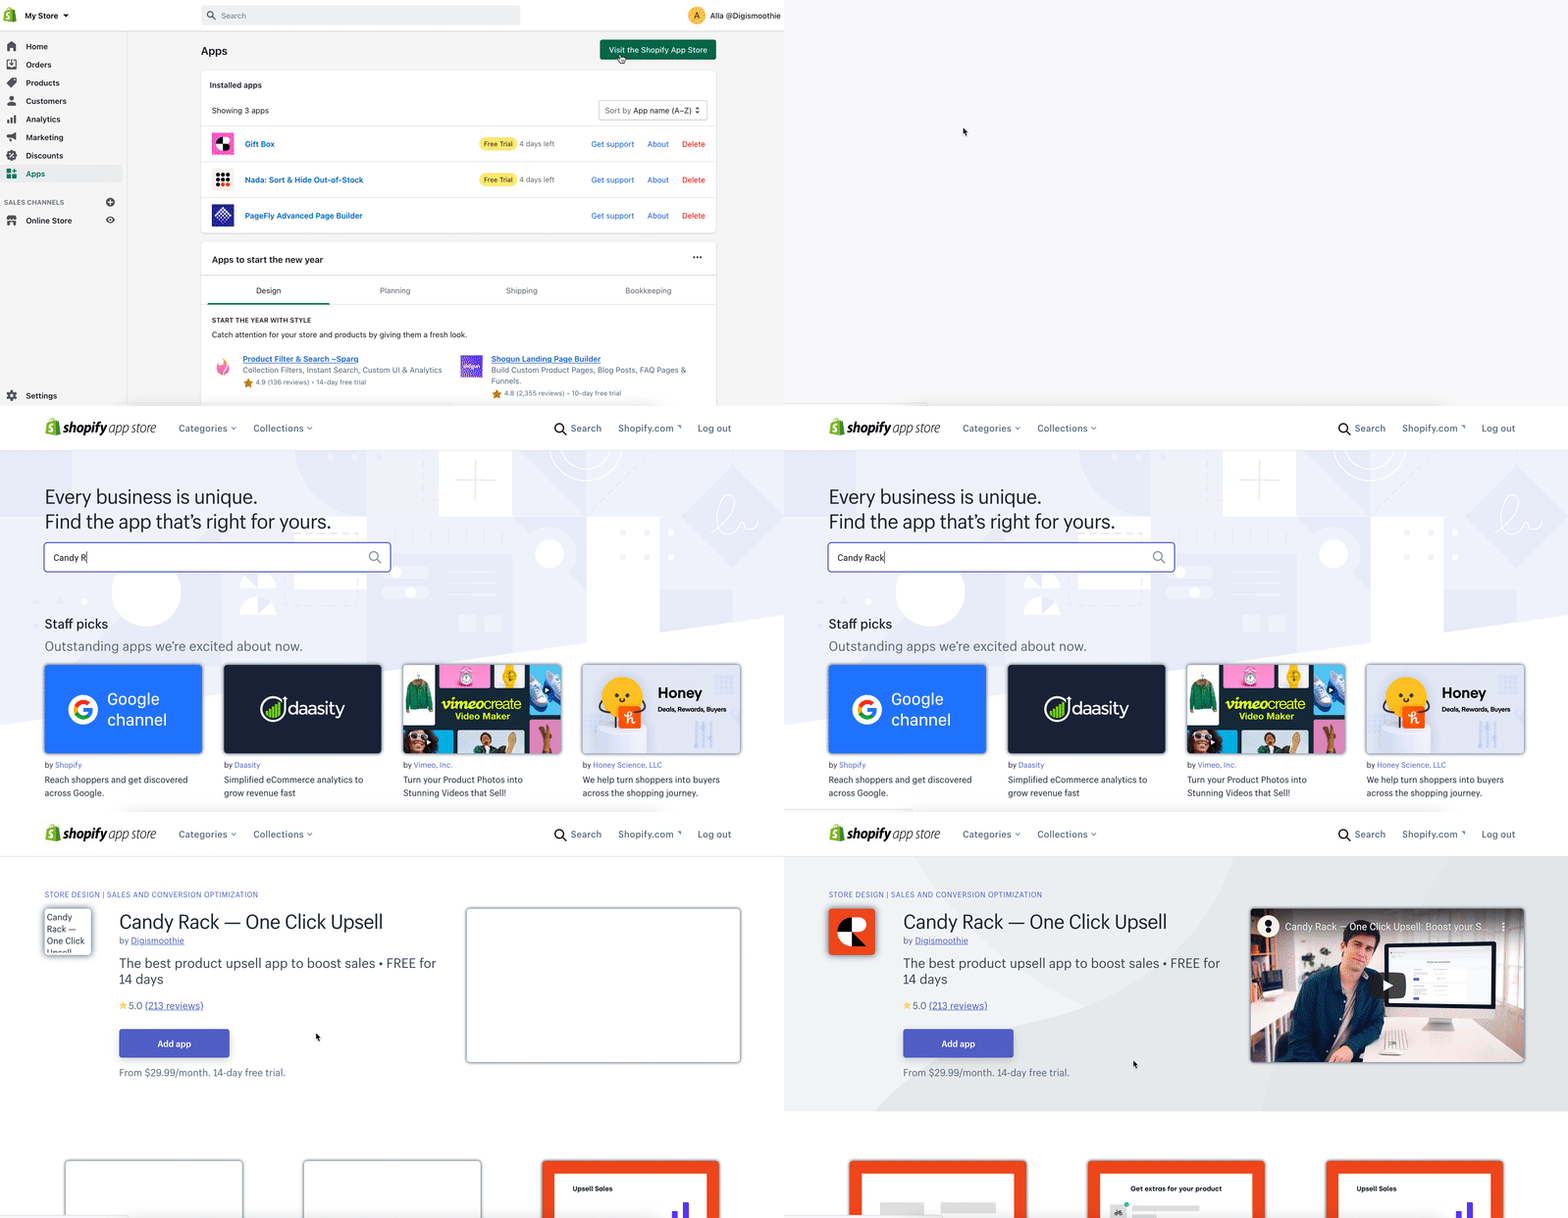
4.2 Create an Upsell Offer
To create your first upsell offer, go to the Apps → Candy Rack and choose one of the Upsell options:
- Product Upsell
- Smart Auto-Upsell
- Gift Packaging
- Custom Gift Note
- Extended Warranty
- Premium Email Support
- Mystery Product
- First in Line
- Incognito Shipping
- Custom Service
We recommend starting from the Product Upsell first and configure an upsell offer for your product(s) or collections individually to see the effect of the App. Over time, you can try different upselling options and experiment with different upsell strategies.
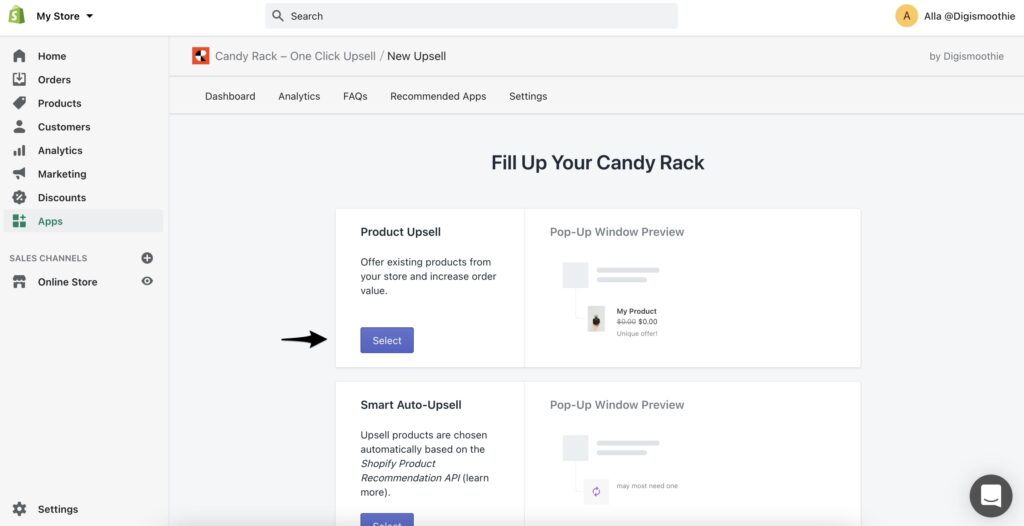
For more information, you can follow the comprehensive guide explaining how to create your first upsell offer with Candy Rack.
STEP 5: Candy Rack and PageFly Integration
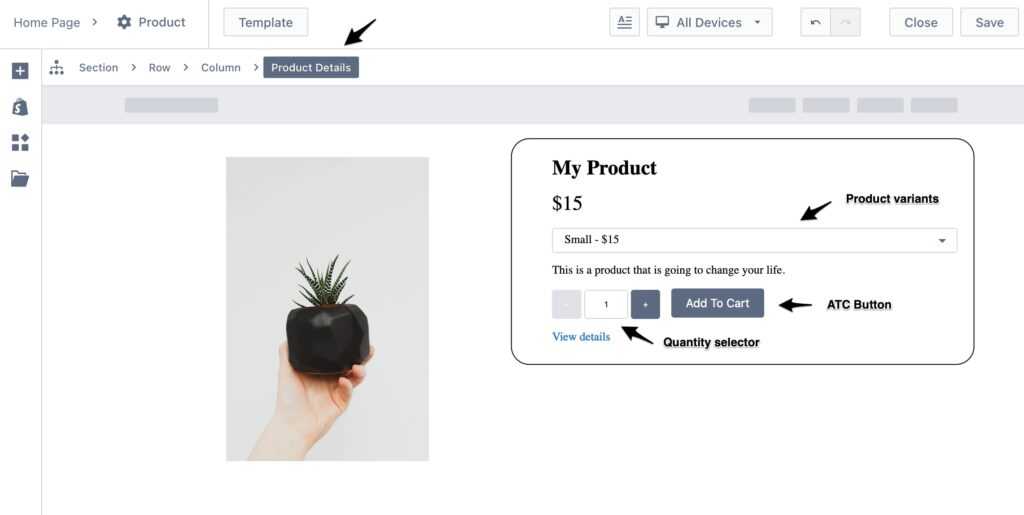
By default Candy Rack and PageFly work perfectly together if you are using the “Product details” element for your product pages. The PageFly Product Details element contains all necessary Shopify elements that Candy Rack needs to use to trigger the pop-up with your upsell offers once a customer clicks on the ATC button.
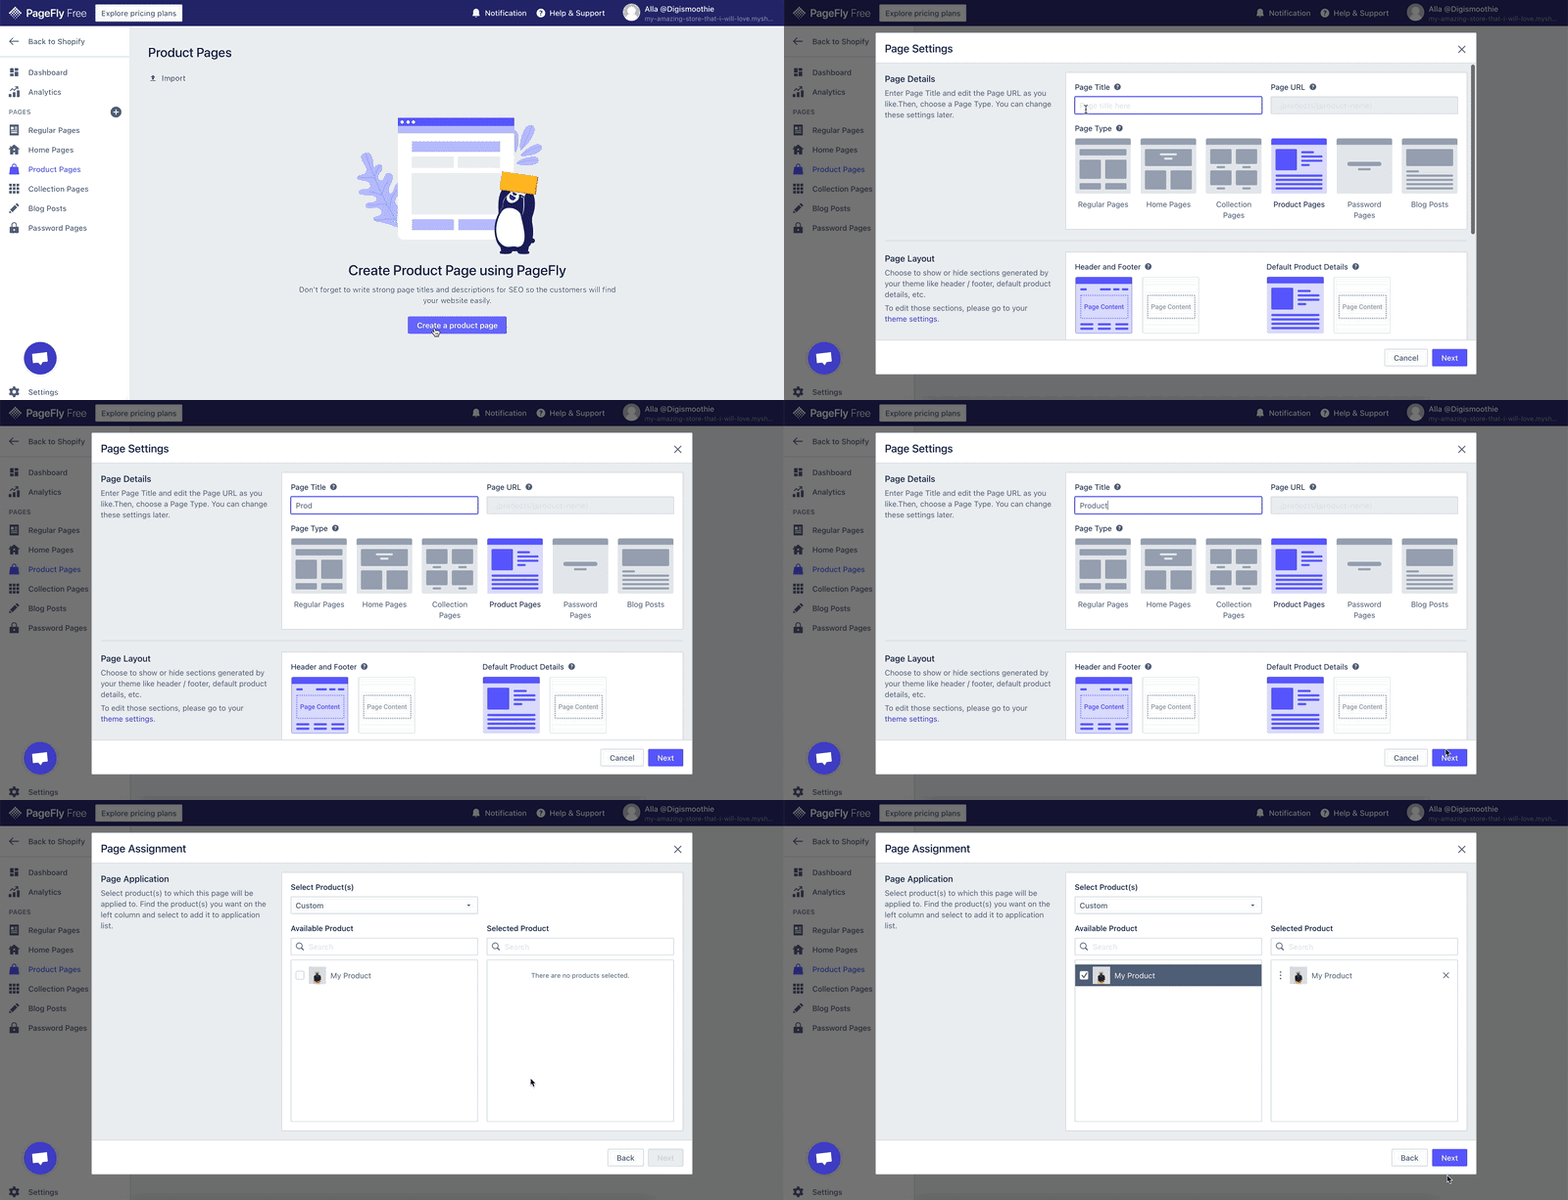
If you are experiencing any problems with the Apps’ integration, the reason might be that the ATC button is placed separately from the Product detail block, so that the Product Variant cannot be detected by Candy Rack App and thus the pop-up cannot be displayed.
DONE 😉
You are ready to go with your new Shopify store exploring the full potential of e-commerce. Feel free to contact Digismoothie or PageFly Team to help you with the settings or any other issues related to the Apps.


